
ENTERING PAYMENTS IN HALCION
See previous pages of this document (Halcion Instructions) for how to determine the correct company in Halcion based on claim #, entering claims and finding the correct branch # and other information. REMINDER: From most screens in Halcion, you can enter K (Kill) or C (Return) as the action to cancel.
BULK PAYMENTS
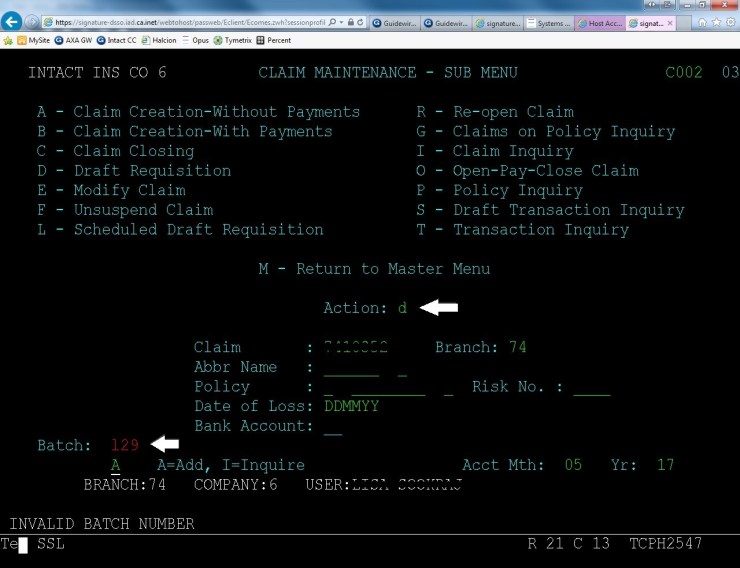
- From Claim Maintenance screen, Action = D
- Enter Batch # bottom left of screen, if you forget the system will not allow you to enter the claim and will prompt you
- First letter of your first name and the present date (day # in month)
- Hit Enter
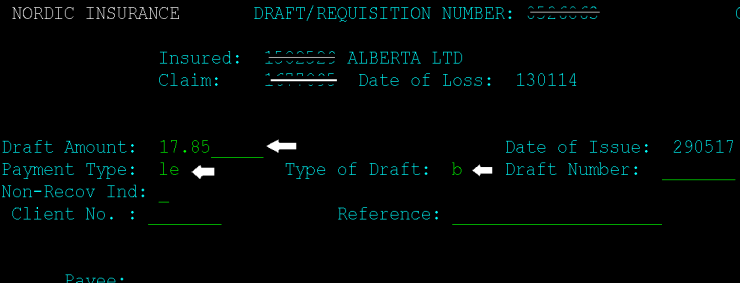
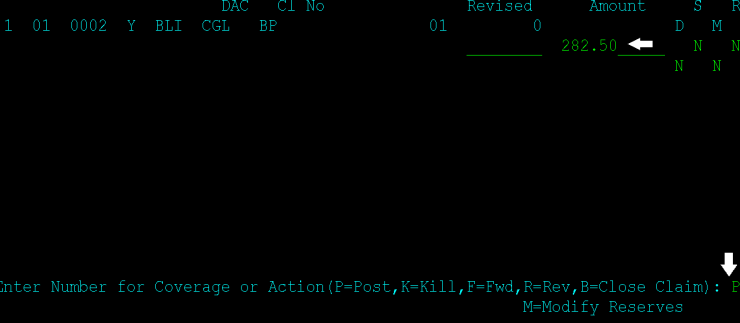
- On the next page, enter the payment amount (no $ sign or comma) beside Draft Amount
- Payment Type (most often LE for Legal Expense – see notes for other coding earlier in this document and on In-House Coding Sheet for in-house payments)
- Type of Draft= B for Bulk (notes on single payments to follow in this document)
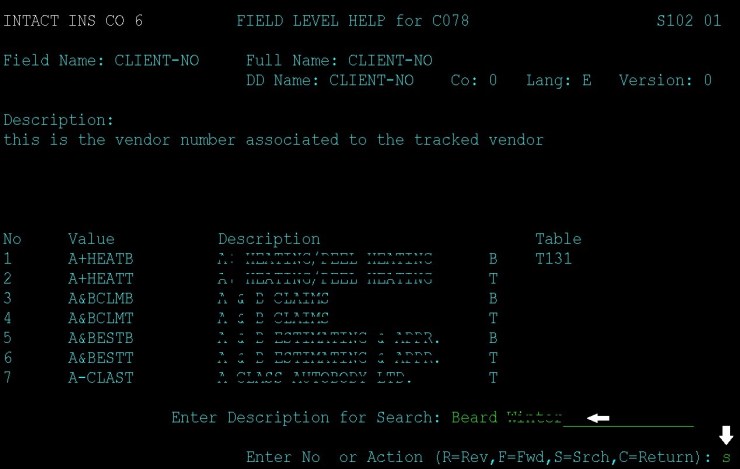
SEARCHING FOR BULK PAYEE
- To search for bulk payee, click on the line beside Client No: then hit F1

- Type in part or all of the payee name.
- Bottom Right of the screen — Action (bottom right of screen) = S (for search) then hit Enter
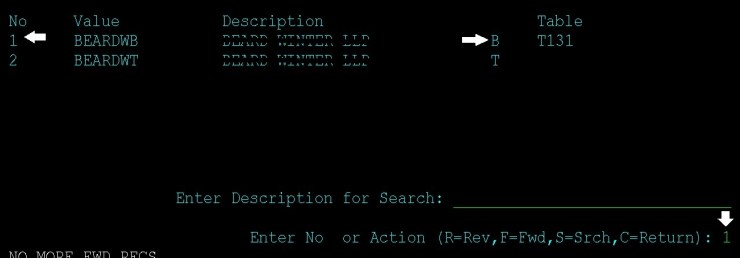
CHOOSING BULK PAYEE
- Once you find the payee, enter the number it is in the list under ‘No.’ on the left side. For bulk payments, choose the one that has a B beside it on the right (i.e. #1 below). Enter the number at bottom of screen then hit Enter
CONTINUE/COMPLETE PAYMENT
- On the next page, tab over to Reference and paste in invoice number copied from the payment log, or if there is no invoice number, use the invoice date instead.
- Bottom right of the screen, Action = C then hit Enter

- On next screen enter the payment amount on the line under amount then hit Enter (P for Post should automatically be at the bottom right as the action)
REVERSING A HALCION TRANSACTION
Ensure you are in the claim under the correct branch number. See pages 3-4 of this (Halcion Instructions) document for how to determine which company a claim is under in Halcion, how to enter claims and how to determine the correct branch number.
VIEW TRANSACTION HISTORY – COPY PAYMENT /CHEQUE
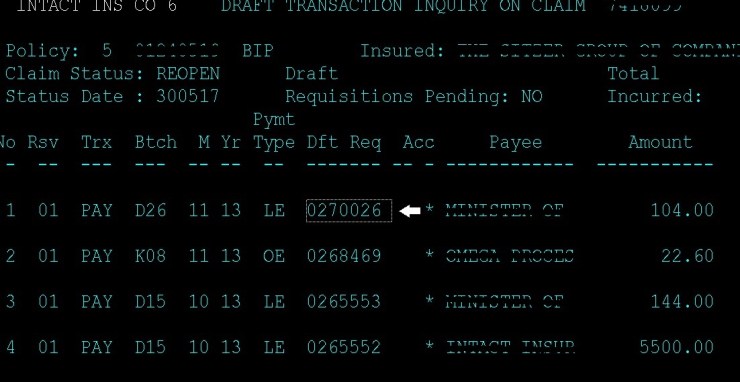
- From the Claim Maintenance Sub-Menu, Action = ‘S’ to view the transaction history
- Locate the payment and copy the cheque # (under Dft Req column) for the payment you need to reverse
- Bottom right of the screen, Action = K (for kill) then hit Enter to return to the Claim Maintenance screen
- Action = M then hit Enter to return to the Master Menu

REVERSE PAYMENT
- From the Claims Master Menu, Action = D (Claims Drafts) then hit Enter

- From the Claim Draft Sub Menu, Action = R (Draft Reversal) and paste the payment # you’d copied on the first line – Requistn/Draft, then hit Enter

- On the Draft Reversal screen Transaction Type = C (Cancellation), then hit Enter

- On the next screen, Draft Reversal Dissection Inquiry, you can double check that all the details are correct. Once you are ready to proceed, P (Post) will already be at the bottom right, hit Enter again

- You’ll find yourself back on the Claim Draft Sub Menu where the bottom will confirm the reversal again with P (Post). Hit Enter.
US CHEQUE REQUEST PROCESS
The process consists of three parts. The first and last parts are requesting the US cheque on the Finance Tile in Lotus Notes. The middle step is issuing the CND equivalent payment in whichever payment system the claim is located in.
See notes earlier on in this document (US Payment Instructions) on selecting correct company and division on Finance Tile request.
PART ONE, ON FINANCE TILE — CREATE REQUEST:
- Click on the Finance Workflow tile in your Workspace in Lotus Notes
- Click Cheques & Drafts (H)
- Click New Request
- Click US Cheque Requisition
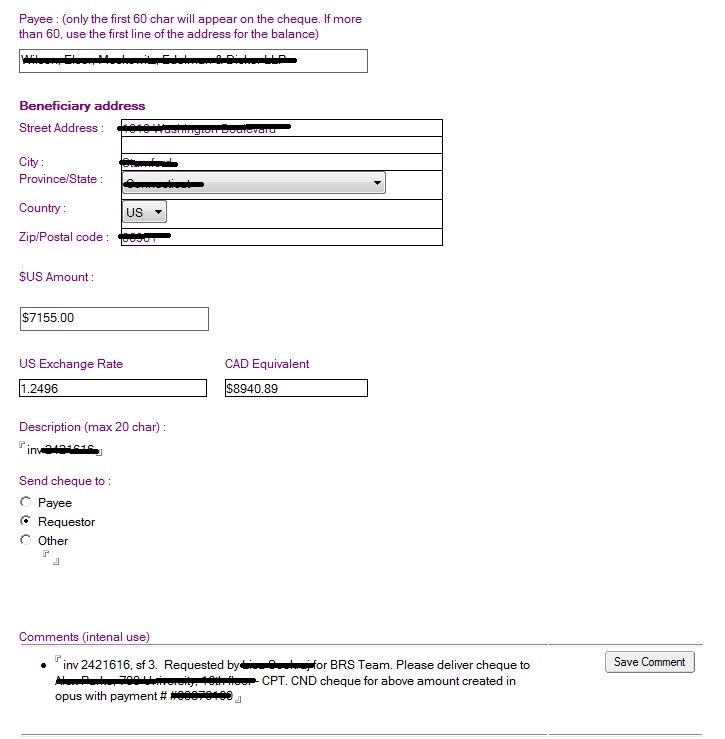
- Input the invoice amount (on the BRS log this appears under the ‘US amount’ column) to calculate the CND amount. If the amount is over $10,000 USD, use this site to calculate the CND amount: http://www.bankofcanada.ca/rates/exchange/daily-converter/
PART TWO, IN PAYMENT SYSTEM — ISSUE CANADIAN PAYMENT:
OPUS SYSTEM
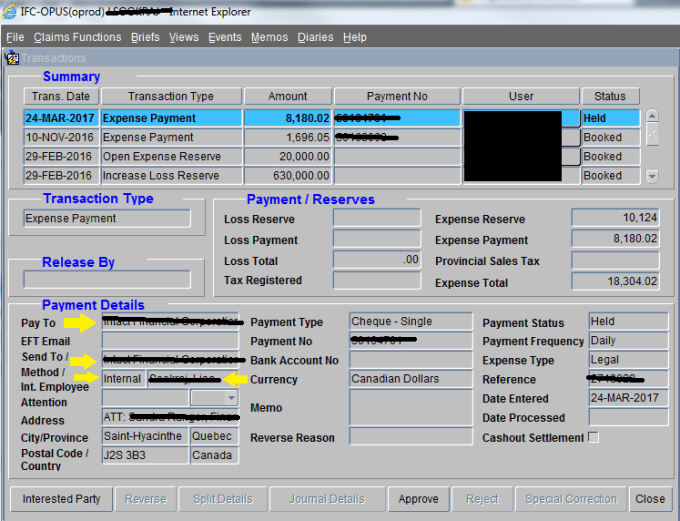
- Determine which subfile to pay under. Check the available expense reserve amount. If there are sufficient reserves, you can proceed with the next step. If not, email the adjuster for a reserve increase (see Email Templates document).
- Click on Assignments and scroll down to see if your name is listed. If you’ve previously issued a US payment under the claim it will be. If not, you must add it the same way we add the Mail Rep for in-house payments. See In-House Payments document for this process.
- Check if our company name is listed under vendors. If not, search under vendors and add as usual.

- Enter the CND payment as in the screenshot below. Add ‘ST H Payables’ to the Attn. line of the address.
- Cheques in Opus are to be sent internally. Select our company name but make sure to select ‘internal’ and then your own name for the send-to method.
PART THREE, ON FINANCE TILE — ENTER COMMENT, DESCRIPTION, US FIRM ADDRESS
- Under Description enter the invoice #
- For Send Cheque To select Requestor
- Enter the comment using the template in the Note Templates document and add the payment # from Opus. If you used the currency conversion site for payments over $10,000, be sure to use the note template that indicates that the CND amount of the cheque differs from that generated by the finance tile)
- Enter the firm address carefully from the Law Firm Addresses spreadsheet
- Double check that all the info you’ve entered is correct. Then click Save and Close, or Save and New if you are doing another request right after.
Memo the claim and BRS log. For system memos and Finance tile comments, please refer to the updated templates found in the Note Templates document.
